How to Isolate IP Cameras on a VLAN Without Breaking Local Recording
Learn the mental model for isolating IP cameras on a VLAN while keeping local NVR recording, NTP, DNS, and admin access predictable.
Learn the mental model for isolating IP cameras on a VLAN while keeping local NVR recording, NTP, DNS, and admin access predictable.
An IP camera should be treated like an untrusted network appliance, not like a laptop. It has firmware you do not fully control, cloud features you may not need, and a service life where updates tend to get irregular. If that camera sits on the same flat network as phones, laptops, smart locks, NAS storage, and home automation, a small camera compromise can become a much larger home network problem.
The goal of a camera VLAN is not just to create a separate Wi-Fi name or make the topology look neat. The goal is to make camera traffic local, restricted, and understandable. Cameras should record to a local NVR. The NVR should have the access it needs. The cameras should not be able to wander across the rest of the LAN or phone home to vendor services unless you decide that trade-off is worth it.
The Isolation Architecture
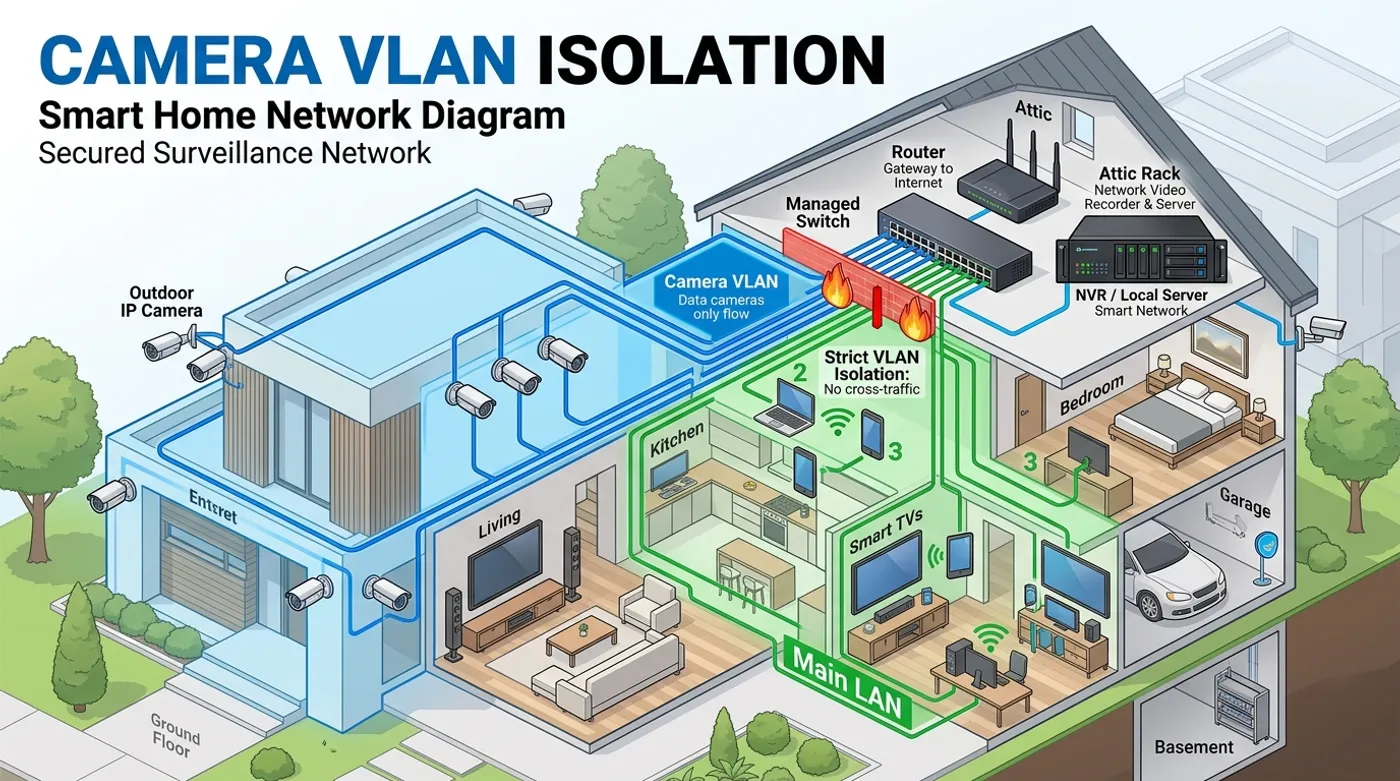
A clean local-first camera design has three basic zones: the main LAN, the camera VLAN, and the recording system. The camera VLAN contains only camera devices. The NVR, NAS, or security server is the controlled bridge into that zone. Normal user devices do not need broad access to camera admin panels, and the cameras do not need broad access back into the main LAN.
In a representative setup, the camera VLAN might be VLAN 30 with subnet 10.30.0.0/24. Cameras receive addresses such as 10.30.0.21, 10.30.0.22, and 10.30.0.23. The NVR might live at 10.10.0.50 on a server VLAN or main infrastructure VLAN. Firewall policy allows the NVR to pull RTSP streams from cameras, but blocks camera-originated traffic to the internet and to personal devices.
Should IP Cameras Be on a Separate Network?
Yes, if the separate network comes with firewall rules. A separate subnet without policy is mostly organization. A camera VLAN becomes useful when it changes what the cameras are allowed to reach.
The normal consumer setup is backwards: cameras can usually reach the internet, vendor APIs, mobile notification services, local devices, and sometimes other cameras. That is convenient for app setup, but it is a poor default for a security system. A local-first setup starts from the opposite position: cameras are blocked by default, and only the required local paths are added back.
There are trade-offs. Blocking internet access may disable vendor app previews, cloud motion alerts, automatic firmware checks, or push notifications. Keeping cloud access enabled may preserve convenience, but it also keeps the vendor in the critical path. The right decision depends on whether you want a consumer camera app or a local security architecture. For local recording, the camera only needs to stream video to the recorder, keep accurate time, and remain manageable by an administrator.
How to Separate a Camera Network Using VLANs
A VLAN separates traffic at Layer 2 while the router or firewall controls traffic between subnets. For a small home security network, the minimum design looks like this:
- VLAN ID:
30 - Camera subnet:
10.30.0.0/24 - Gateway:
10.30.0.1 - Camera DHCP range:
10.30.0.20to10.30.0.99 - NVR address: fixed address outside the camera VLAN, such as
10.10.0.50 - Local NTP source: router, firewall, or internal server
- Admin access: temporary or restricted, not broad and permanent
The important part is not the exact number 30; it is consistency. Camera ports on a switch should be access ports for the camera VLAN, which means the camera itself does not need to understand VLAN tagging. Uplink ports between switches and the router should carry the camera VLAN as a tagged network. If Wi-Fi cameras are involved, the camera SSID should map to the camera VLAN instead of dumping devices into the main LAN.
Static DHCP reservations are usually safer than manually configured static IPs on the camera. The DHCP server remains the source of truth, but each camera always receives the same address. That makes firewall rules, NVR stream URLs, and documentation stable without forcing you to touch each camera interface every time the subnet changes.
How to Isolate an IP Camera Without Losing NVR Recording
The common mistake is blocking the camera VLAN so aggressively that the NVR cannot record. Isolation does not mean every packet disappears. It means every permitted path has a reason.
A good starting traffic policy is:
- Camera VLAN to WAN: block.
- Camera VLAN to main LAN: block.
- Camera VLAN to router NTP: allow.
- Camera VLAN to external DNS: block or redirect to local DNS.
- NVR to camera VLAN: allow required video and management ports.
- Admin workstation to camera VLAN: allow only when needed.
For many IP cameras, the recorder pulls video using RTSP on TCP 554, HTTP/HTTPS for snapshots or admin access, and sometimes ONVIF discovery or event metadata. The exact ports vary by camera, but the direction matters more than the port list: the NVR should be allowed to reach the cameras; the cameras should not be allowed to initiate arbitrary connections back into the rest of the house.
If the NVR is inside the camera VLAN, recording is simple but management can become less flexible. If the NVR is outside the camera VLAN, firewall rules need to be more precise, but the NVR can also serve as the controlled integration point for Home Assistant, notifications, and storage. For most local-first homes, the second approach is cleaner because the cameras stay contained while the recorder becomes the trusted boundary.
Blocking the Route to the Internet
The SERP snippets point to the core rule: do not let the camera VLAN route anywhere by default. That is the right instinct, but it needs to be implemented as an ordered policy instead of a vague idea.
- WAN block rule: deny traffic from
10.30.0.0/24to the WAN or any non-local destination. This prevents cameras from contacting vendor APIs, cloud storage, telemetry endpoints, and public NTP or DNS services. - Local NTP: allow cameras to reach a local NTP server, for example
10.30.0.1or an internal infrastructure host. Accurate timestamps matter for evidence review and event timelines. A camera with the wrong time is still recording, but the footage becomes harder to trust. - Local DNS: cameras often do not need external DNS for local recording. If a camera becomes unstable when DNS is blocked, route its DNS requests to a local resolver and observe what names it tries to resolve. That tells you whether the device is trying to reach vendor services or simply failing because its firmware expects DNS to exist.
- NVR exception: allow the NVR IP to reach camera IPs on the ports your recorder actually uses. Avoid broad bidirectional rules such as “allow main LAN to camera VLAN” because they undo the isolation you just built.
This policy gives you a strong default without pretending every environment is identical. A fully local camera may work with no DNS and only local NTP. A cloud-first camera may become noisy or partially broken. That is useful information: the device is telling you how dependent it is on the vendor.
How to Isolate an IP Camera?
Start by deciding what the camera must do locally. For a security camera, the critical functions are video stream, time sync, power, storage path, and controlled admin access. Everything else is optional until you prove you actually need it.
The process is:
- Move camera ports or camera Wi-Fi into a dedicated VLAN.
- Assign stable IP addresses with DHCP reservations.
- Confirm the NVR can see the streams before adding strict firewall rules.
- Block camera traffic to WAN.
- Block camera traffic to the main LAN.
- Add local NTP and DNS handling.
- Add only the NVR and admin exceptions needed.
- Test from the camera side and the LAN side.
The best test is not whether the app still opens. The best test is whether the recorder still captures footage while the camera cannot reach the internet and cannot initiate traffic to personal devices. That is the local-first standard.
Verification Checklist
Run verification from both directions. A camera VLAN can look correct in the router UI and still be wrong in practice.
- The NVR can view live streams from every camera.
- The NVR keeps recording after router and switch reboots.
- A laptop on the main LAN cannot open camera admin pages unless an explicit admin rule exists.
- Cameras cannot reach public internet targets.
- Cameras keep accurate time using local NTP.
- DNS behavior is understood: blocked, redirected, or intentionally allowed.
- Home Assistant receives the intended events through the NVR or a controlled integration path.
- Vendor cloud features are either disabled, blocked, or intentionally allowed as a conscious trade-off.
The final architecture should be boring: cameras stream locally, the recorder records locally, and every cross-VLAN path exists because you can explain why it is there.
Keep reading
Related guides
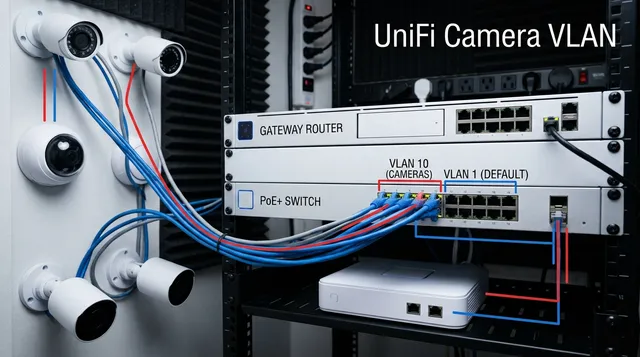
UniFi Camera VLAN Isolation for Local NVR Recording
Configure a UniFi camera VLAN that blocks WAN access, keeps RTSP recording local, and gives the NVR exactly the access it needs.
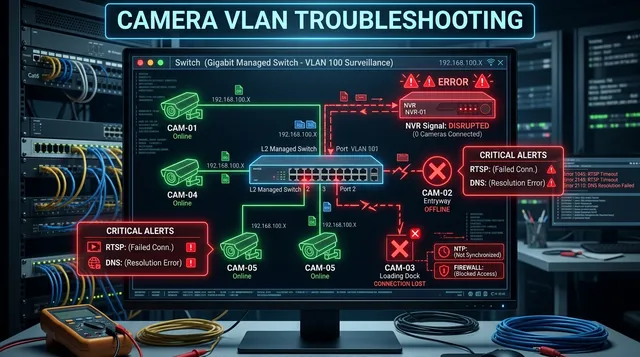
Camera VLAN Not Working: Fix NVR, RTSP, DNS, and Firewall Issues
Diagnose camera VLAN failures when streams, NVR access, NTP, DNS, firewall rules, or isolated mobile viewing stop working.
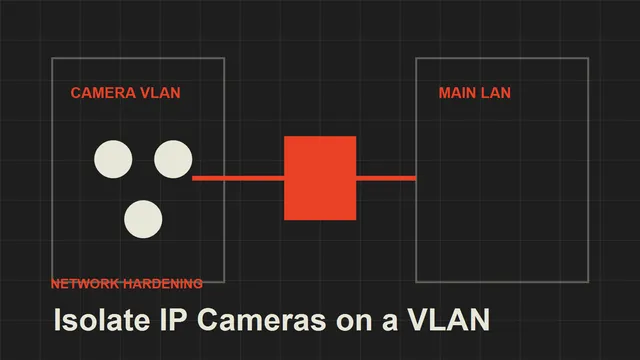
How to Isolate IP Cameras on a VLAN
A practical local-first guide to isolating IP cameras from your main home network without breaking recording or access.